SPPAS Security Information

SPPAS is an appraisal system that values the safety and protection of customer data above all else. SPPAS uses the SharePoint Framework (SPFx) development model and full trust client-side solutions that guarantee the integration of SharePoint data without compromising the safety of SharePoint environments.

Customers can rest assured that their data is not collected by SPPAS, and the organization implements several security measures, such as thorough security code reviews and daily automated testing, to ensure product reliability.

We Think Security

At SPPAS, we recognize the importance of keeping your SharePoint environment secure and safeguarding your organization’s sensitive data. Our top priority is to ensure the privacy and security of our customers’ data, which we have taken into account during the design of SPPAS.

This guide serves as your primary resource to learn about the safety and security measures we implement at SPPAS to seamlessly integrate our powerful appraisal system into your environment without accessing any of your data. Our system is specifically designed to prevent access to the information you generate, store, transfer, and use within your environment. Additionally, we’ll provide insights into the crucial practices we employ within our organization to ensure that our daily operations are secure and protected against unauthorized access and other security threats.

SPPAS is Entirely Installed in Your Environment

We acknowledge that prior to installing SPPAS on your Office 365 or SharePoint 2019 environment, you may have several concerns such as:

  • Will the SPPAS SPFx cause any modifications to my site upon installation?
  • On which sites will the application be accessible?
  • How can I effectively manage the SPPAS SPFx app?

Essentially, you may be apprehensive about the immediate effects that SPPAS could have on your SharePoint sites post-installation.

To provide clarity, here’s what you can anticipate after installing SPPAS SPFx into Office 365:

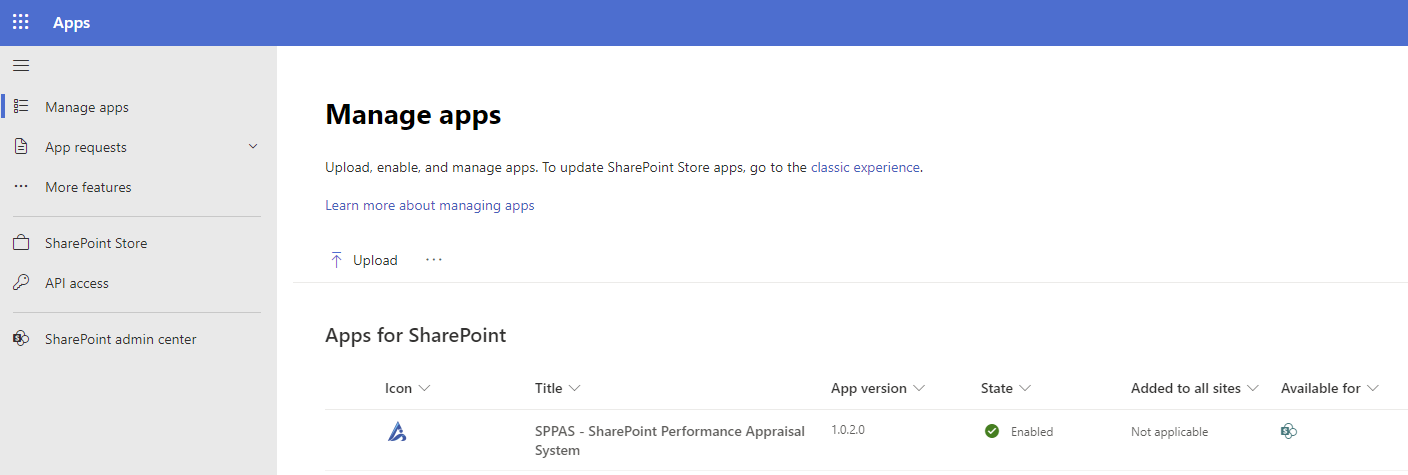
1. The app will appear in the list of installed apps in the Tenant App Catalog.

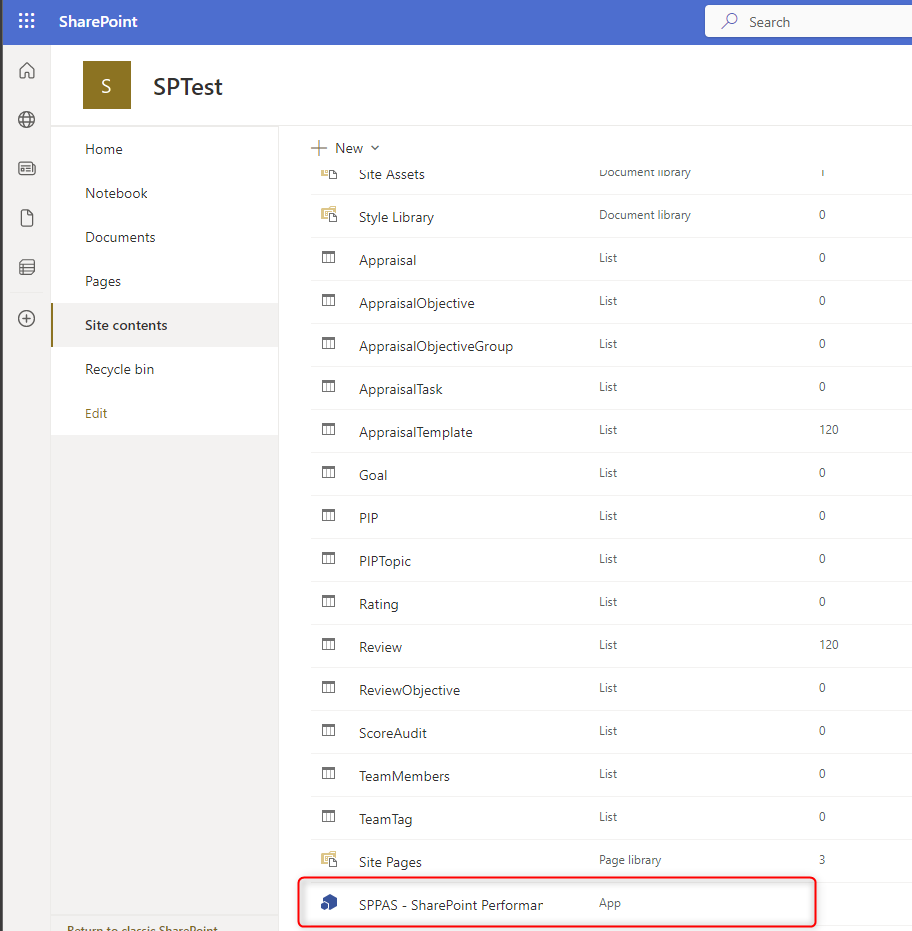
2. One new item will appear in the Site Contents of the site where you installe:
SPPAS – SharePoint Perfomance Appraisal System:

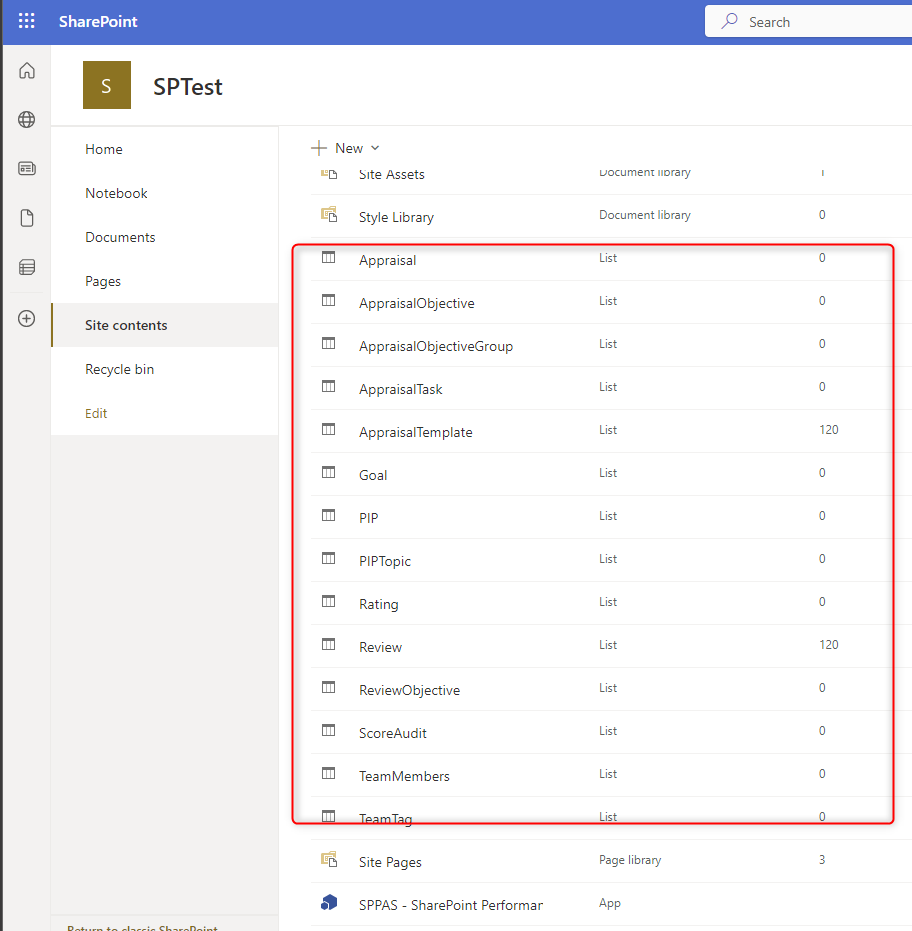
3. Additional lists will be created to store the appraisal data.

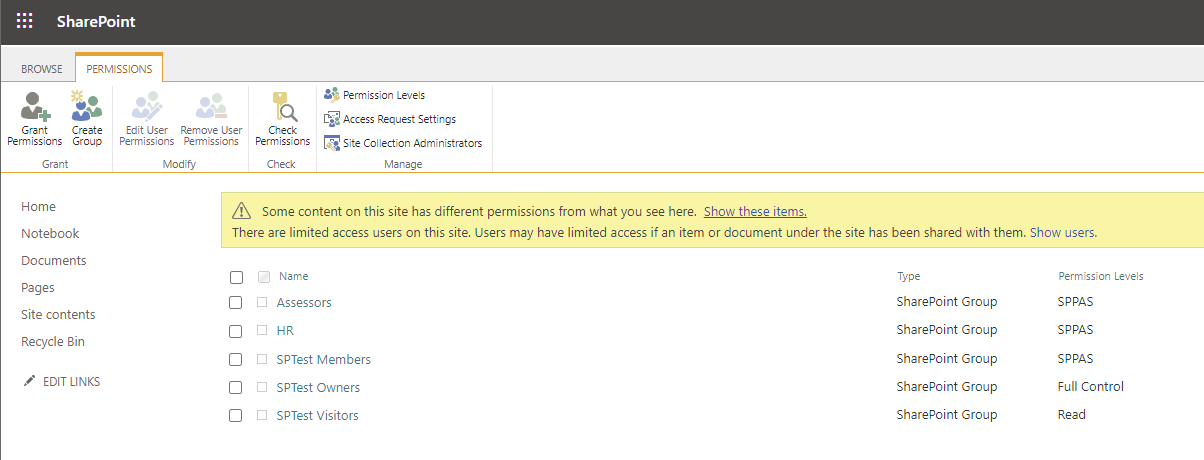
4. New groups and permission levels will be created on the team site that SPPAS was installed. This is to manage the users who visit the site and prevent users from accessing and modifying the lists created previously directly.

Other than these changes, there will be nothing else that appears in your environment after installing SPPAS SPFx.
No existing page lists will be affected.

Security by Design

As SPPAS is primarily used for user appraisals, several of our users have expressed concern about whether the data stored within their SharePoint sites and pages is shared with SPPAS. The brief answer is that it is not shared with us. However, it’s important to delve into the specifics of how SPPAS is installed within an Office 365 environment to gain a better understanding.

SPPAS is entirely installed in your environment.

SPPAS utilizes the SharePoint Framework (SPFx) development model, which allows for seamless client-side SharePoint development and integration with SharePoint data. This framework is also known as a full trust client-side solution, meaning that it incorporates full trust client-side code and can operate in full trust.

At SPPAS, we prioritize adhering to Microsoft Office 365, SharePoint, and SAP Cloud Security principles and guidelines while creating our solution. All scripts are executed exclusively within your SharePoint environment’s confines, and we do not grant access to your content in any way. We also employ additional security measures to ensure the constant safety and protection of all your data and information.

Your Data Untouched

Can SPPAS acquire any data from my environment, and if so, what kind of data is collected? Also, is there a possibility that SPPAS may store the data that is collected?

SPPAS collects only:

  1. The necessary information to activate & check SPPAS License. The following information is collected:
    • Tenant URL
    • User email address

Security Compliance

At SPPAS, we prioritize the security of our organization and the products we offer. We continuously oversee over 100 security controls across our company, and our security policies and procedures undergo regular reviews, approvals by management, and dissemination to all employees. Additionally, our security committee thoroughly evaluates the development of all product functionalities, and we mandate security code reviews for all changes.

Reliability

We have implemented several methods in our daily product development and maintenance processes to ensure the reliability of SPPAS. These include:

Night Watch Testing: We conduct automated end-to-end testing on a daily basis to detect any changes that may impact the performance of the SPPAS product. This allows us to quickly identify any required updates or fixes and implement them promptly.

Risk-Free Upgrades: Our product features provide you with control over when and how your sites are upgraded. We guarantee that SPPAS upgrades are smooth and efficient, with no downtime, allowing you to upgrade with confidence.

How SPPAS Works

Starting from version 1.0.4, there is a change in nomenclature.
Assessors -> Assessors are now termed Appraisers.
Assessees -> Assessees are now termed Appraisees.
Those names are interchangeable. Some of our resources my still have those terms unchanged.

Abridged User Guide

Download an abridged PDF document to learn how to use SPPAS.

You can create two types of appraisals in SPPAS

  • Performance Review: This is the general performance review which is done monthly, semi-annually or annually depending on the organization.
  • Promotion/Probation Review: This is specifically done to review a single employee’s performance.

Regardless of the type of appraisal, the following needs to be done.

Roles

There are three roles in SPPAS

  • HR Members: This role can add Appraisers and other HR members. The role can initiate an appraisal process.
  • Appraisers: This role is responsible for appraising team members. HR Members role is the only role that can add Appraisers.
  • Users/Team Member: Everyone in your Office 365 who is not an external user is a member of this role. Appraisers add them to their team member list so they can appraise them.

Steps to perform a review

Step 1: HR Members Add Appraisers

You have to add all Appraisers in the Appraisers list. Appraisers is anyone who will appraise or review another person’s performance.

Adding Appraisers

Step 2: Appraisers add their team members

Appraisers will add all staff/team members that they are responsible for reviewing their performance.

Step 1: HR Creates a template

HR starts the appraisal process by creating a template.

  • Specify the name of the template
  • Select the appraisal type as Performance Review
  • Select the appraisal start date. When the date comes, Appraisers can create their own template.

Click Save

From the Objective tabs, add objectives.

These objectives are what we call Core Values Objectives. These are organizational values that every employee will be appraised on.

Step 2: Appraisers create their own template

Appraisers will create their own template using the one created by HR as the base. They will add Key Business Area Objectives to the template.
Appraisers can create as many templates as they want. This helps them to create different templates with different Key Business Area objectives for different team members.

Step 3: Appraisers starts the Appraisals

Appraisers will start the appraisal process by creating appraisals from their template. They can publish such template to a team category (Appraisers can categorize their team member) or to a specific individual.

Step 4: Appraisers scores the objective

Appraisers will then score each objective, both core values objective and key business area objectives. Once finished, Appraisers will mark as complete.

Step 5: Appraisees give their comments

Appraisees (person being reviewed/appraised) will get a task. From the task, they can add their comments regarding the review. Appraisees can dispute their score and attach any evidence.

Step 6: Appraisers give their comments

Appraisers are then given an opportunity to comment on the review and react to any comments that was given by the Appraisees.

Step 7: A manager adds their comments

If another person was chosen as a manager (senior supervisor), they get the opportunity to add their comments.

Step 8: Appraisal completes

HR can add their comments if the appraisal process was set up that way. HR can view all completed appraisals and they get the opportunity to

  • Start a PIP (Performance Improvement Plan) in cases where the individual needs improvement.
  • Adjust the scores when there is the need to.

Step 1: HR Creates a template

HR starts the appraisal process by creating a template.

  • Specify the name of the template
  • Select the appraisal type as Promotion or Probation Review
  • Select the Assessee and Assessor
  • Select the appraisal start date.

Click Save

From the Objective tabs, add objectives.

Step 2: HR starts the Appraisals

HR will start the appraisal process. Assessor and Assessee will be notified that the process has started.

Step 3: Assessors scores the objective

Assessors will then score each objective, both core values objective and key business area objectives.

Once finished, assessors will mark as complete.

Step 4: Assessees give their comments

Assesses (person being reviewed/appraised) will get a task. From the task, they can add their comments regarding the review. Assesses can dispute their score and attach any evidence.

Step 5: Assessors give their comments

Assessors are then given an opportunity to comment on the review and react to any comments that was given by the Assessee.

Step 6: A manager adds their comments

If another person was chosen as a manager (senior supervisor), they get the opportunity to add their comments.

Step 7: Appraisal completes

HR can add their comments if the appraisal process was set up that way. HR can view all completed appraisals and they get the opportunity to adjust the scores when there is the need to.

Learning Center

How SPPAS Work

Let’s help you get started. Learn how to use SPPAS. Whether you are HR, Assessor or Asseesee, you will find it helpful.

Read the Docs

Get started by reading the documentation. Get full understanding of all aspect of SPPAS

How to Install SPPAS

Installation Guide

Download the PDF document to learn how to install SPPAS on your SharePoint online tenant.

My Goals

For each key business result that an Appraisers adds to an appraisal, a corresponding goal will be created. The aim of the created goal is for an Appraisee to update it to record their progress towards achieving the key business result.

You pending goals can be accessed from the home page. From here, you can select a goal to update.

Update a Goal

  1. Select the Home icon, and then select the My Goals (Pending) tab
  2. Click on the goal you want to update
  3. From the goal dialog form, update the details
  4. Click Save to submit the changes.

Templates Delegated to Me

Templates allow Appraisers to start an appraisal for a group of team members using the same objectives. Appraisers have the ability to delegate this task to one of their team members to do this.

Once a template has been assigned to you, you can add key business result areas to the template. Follow the steps below to update a template.

  1. Go to the Home page and select Delegated To Me (Appraisal template) tab
  2. Select the template and on the command bar along the top, select Edit.
  3. Select New Objective and in the dialog form that will open, fill in the details.
    • Title Fill in the title of the core value objective.
    • Group Select the group this objective belongs to. If you have not created a group yet, click on Add to create a new group.
    • Description Fill in the description for the of the core value objective.
    • Priority Fill in the priority.

      Notes:
      Priority is not a rating but just show the level of importance for the stated objectives. Prioritize by ranking the objectives/expected results in terms of their importance to the job to be performed. Prioritize according to the following guideline:
      Priority 1 = Important
      Priority 2 = Very Important
      Priority 3 = Critical

    • Exceed Expectations (EE) Rating Criteria Fill in what constitutes an EE
    • Met Expectations (ME) Rating Criteria Fill in what constitutes an ME
    • Require Improvement (RI) Rating Criteria Fill in what constitutes an RI
  4. Click on Save to add the core value object.

PIPs Management

When a report of poor performance is made at the end of a review period, HR can start a Performance Improvement Plan (PIP).

A Performance Improvement Plan (PIP) is a process that gives an employee with performance deficiencies the opportunity to improve. Performance Improvements Plans must be for a short term, as a corrective measure to ensure employees are performing at their best at all times.

The PIP should have a structured performance targets to be achieved by individuals for a minimum period of 3 months and a maximum period of 6 months.

When an appraisal result of an employee’s performance is deemed to be poor at the end of each review period, the HR can initiate a PIP.

Below is the PIP lifecycle within SPPAS.

  1. HR initiates a PIP by setting the start and ending dates. HR will add specific improvement objectives/target.
  2. Appraiser may also add additional improvement objectives/target.
  3. HR, Appraiser and Appraisee updates each objective/target by updating with comments
  4. Appraiser will indicate if the PIP process was successful (employee was able to improve performance deficiency) or not at the end of the process.
Start a PIP
  • Go to Admin > Appraisals, and select the appraisal that you want to start the PIP process.
  • Select the ellipsis icon  The More Options button. 
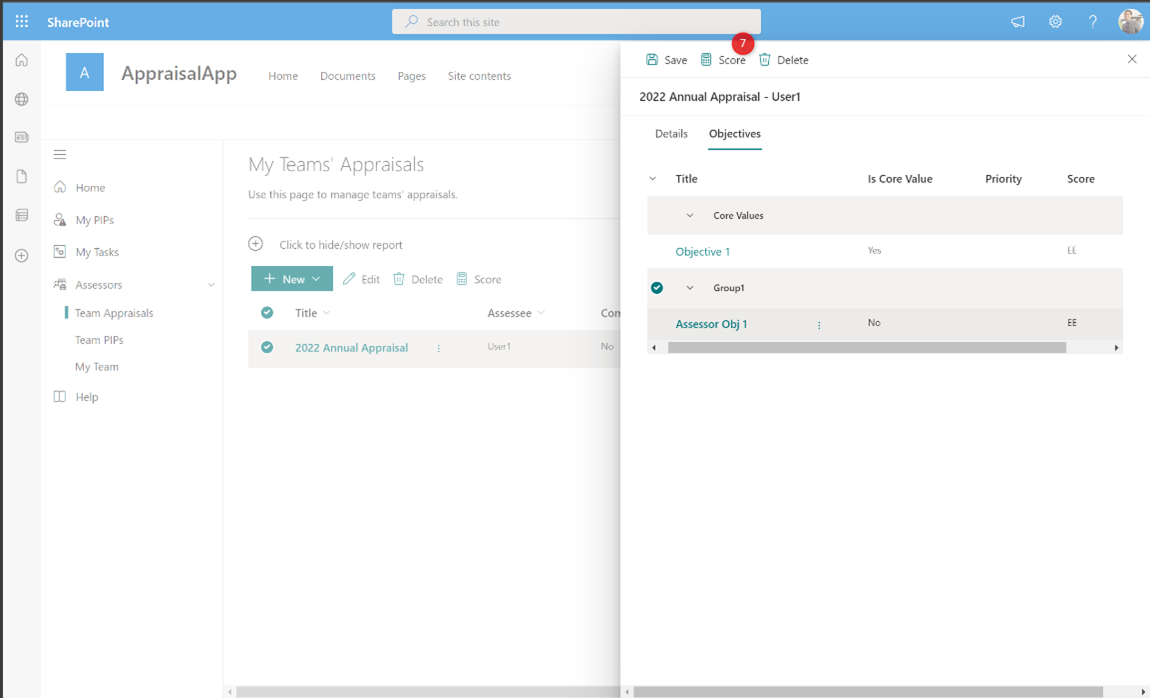
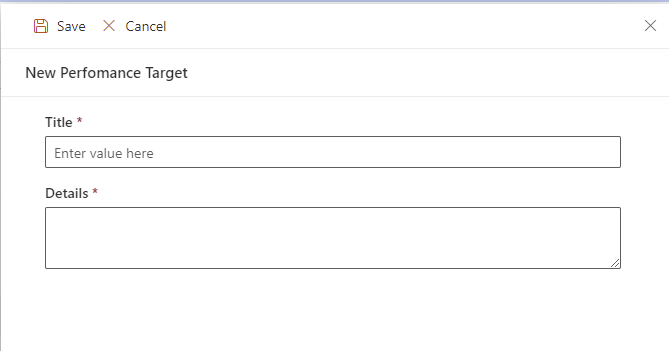
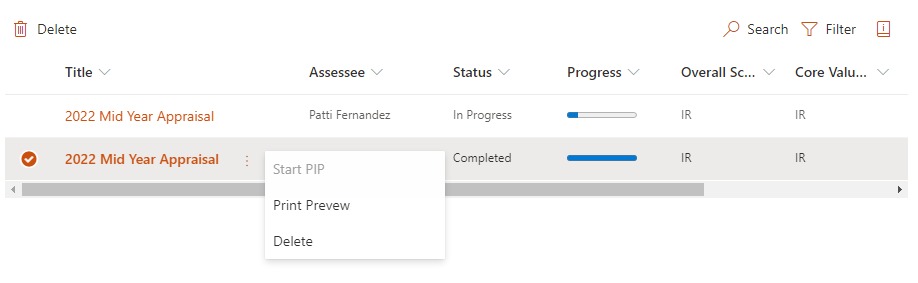
(More) and then select Start PIP and in the dialog form that will open, fill in the details.

    You can select multiple appraisals to start a PIP process. If you start a PIP on a single appraisal, you will be redirected to the PIPs page for you to add performance targets. If you start for multiple appraisals, go to Admin > PIPs and add performance targets to the PIPs you created.

Add Performance Targets – HR
  • Go to Admin > Appraisals, and select the particular PIP.
  • Select the ellipsis icon  The More Options button. (More) and then select Edit to open the dialog form.
  • In the Performance Targets pane, select New and in the dialog form that will open, fill in the details.
    • Title Fill in the title of the performance target objective.
    • Details Give a description of what the performance target is to achieve.
  • Click on Save to add the performance target. Continue to add more performance target.
Add Performance Targets – Appraiser
  • Go to Appraisers > Team PIPs, and select the particular PIP.
  • Click on the PIP to open the dialog form.
  • In the Performance Targets pane, select New and in the dialog form that will open, fill in the details.
    • Title Fill in the title of the performance target objective.
    • Details Give a description of what the performance target is to achieve.
  • Click on Save to add the performance target. Continue to add more performance target.
Commenting on Target

HR, Appraisers and Appraisees can comment on a performance target to indicate the work they are doing to achieve the target. To comment on a performance target

  • For HR, go to Admin > PIPS. For Appraisers, go to Appraisers > Team PIPs and for Appraisee, go to My PIPs and click to open the particular PIP.
  • Click the Performance Targets tab.
  • Click on the particular target you want to comment.
  • Enter your comment using the comment form, or click on Reply to reply to a comment.
Closing a PIP

PIPs can only be closed by Appraisers. When closing a PIP, you will indicate if the Appraisee passed the PIP. To close a PIP

  • Go to Appraisers > Team PIPs and select the PIP you want to close.
  • Select the ellipsis icon  The More Options button. (More) and then select Close PIP.
  • In the dialog form that opens, select whether the Appraisee passed or not. Add your comments.
  • Click Ok to close the dialog form.

Appraisals Management

The appraisal page shows all the appraisals that have been created in your tenant. When an appraisal is created by Appraisers for their team members, they will appear on the appraisal page. The Appraisals page can be accessed by going to Admin > Appraisals.

As a HR, you can perform the following actions at the appraisal page:

Let’s take a look around

At the top left of the Appraisals page library page is the main menu.

Here you can search for an appraisal, filter the appraisals and open a help documentation for the appraisal page.

When you select an appraisal, the menu at the top left of the appraisal page changes to a list of actions you can perform on that appraisal.

You can see similar actions and additional actions by clicking the ellipses The More Options button.next to the file name.

Start a PIP Process

A Performance Improvement Plan (PIP) is a process that gives an employee with performance deficiencies the opportunity to improve. Performance Improvements Plans must be for a short term, as a corrective measure to ensure employees are performing at their best at all times.

The PIP should have a structured performance targets to be achieved by individuals for a minimum period of 3 months and a maximum period of 6 months.

When an appraisal result of an employee’s performance is deemed to be poor at the end of each review period, the HR can initiate a PIP.

Below is the PIP lifecycle within SPPAS.

  1. HR initiates a PIP by setting the start and ending dates. HR will add specific improvement objectives/target.
  2. Appraiser may also add additional improvement objectives/target.
  3. HR, Appraiser and Appraisee updates each objective/target by updating with comments
  4. Appraiser will indicate if the PIP process was successful (employee was able to improve performance deficiency) or not at the end of the process.

Go here learn how to start and manage PIP process.

Print an Appraisal

To print an appraisal

Step 1:
Select the template that you want to print.

Step 2:
On the command bar along the top, select Print

Note: If you don’t see Print on your command bar, select the ellipsis icon  The More Options button. (More) and then select Print

Step 3:
A dialog form shows with a preview. Select Print to print the appraisal.

Delete Appraisals

Select the template that you want to delete.

Step 2:
On the command bar along the top, select Delete

Note: If you don’t see Delete on your command bar, select the ellipsis icon  The More Options button. (More) and then select Delete

Step 3:

Confirm that you want to delete by clicking the OK button.

Change Appraisal Score

HR members have the capability to change the scores for an appraisal.

Step 1:

Select the template that you want to change the score.

Step 2:
On the command bar along the top, select Change Score

Note: If you don’t see Change Score on your command bar, select the ellipsis icon  The More Options button. (More) and then select Change Score

Step 3:

Update the score for the objectives

Step 4:

Click Save & Update Score.

Overview

SharePoint Appraisal System (SPPAS) is a performance appraisal system built on the SharePoint platform by Microsoft. It incorporates well proven appraisal methodology to help companies and organisations assess their staff. SPPAS can be used for:

  • Probation Assessment
  • Promotion Assessment
  • Performance Assessment

The overall appraisal process used by SPPAS can be summarized by the diagram below:

  1. The process starts by HR defining some core values that all staff must be assessed on. HR determines when this appraisal should be available for Assessors to start the process.
  2. Appraisers creates a template from the base template HR created. Assessors add Key Business Results that Assesses must be evaluated on. Appraisers will then rate each objective and a final score is calculated by SPPAS.
  3. Appraisees then add their comments to the appraisal. This gives them the opportunity to dispute any scores and attach evidence where necessary.
  4. Appraisers add final comments to appraisal. They also have opportunity to respond to comments made by Appraisees.
  5. Where a manager is selected to be part of the appraisal process, the Manager will then add his/her comment.
  6. HR will add comment if the appraisal process was set up to require comments from them.

When a report of poor performance is made at the end of a review period, HR can start a Performance Improvement Plan (PIP). The PIP process can be summarized below:

  • HR initiates a PIP by setting the start and ending dates. HR will add specific improvement objectives/target.
  • Appraiser may also add additional improvement objectives/target.
  • HR, Appraiser and Appraisee updates each objective/target by updating with comments
  • Appraiser will indicate if the PIP process was successful (employee was able to improve performance deficiency) or not at the end of the process.

HR Overview

HR (Human Resource) in SPPAS refers to person or group of persons who are in charge of the appraisal process. These individuals are part of a SharePoint group called HR. They are responsible for the following: